cartographer 介绍 Cartographer是一个跨多个平台和传感器配置提供2D和3D实时同步定位和绘图(SLAM)的系统。cartographer的应用较为广泛,比如我们平时所见到的送餐机器人大多都是通过cartographer建立的地图
简而言之,SLAM地图构建的过程是通过激光传感器对周围的环境进行检测,从而完成对周边环境的地图情况构建,同时,cartographer还会对环境进行回环检测,检查之前的运动是否已经到达过这个地方,最后完成地图的闭环,完成整个地图
本文介绍cartographer的安装和使用,如要详细学习cartographer的原理可以参考官网的说明https://google-cartographer.readthedocs.io/en/latest/index.html
cartographer下载和安装 对于cartographer的实现,目前官方还没有支持ROS2,但是ROS2社区对cartographer进行单独的fork并实现了部分的ROS2接口,因此,我们需要从ROS2社区进行cartographer的下载
注意,关于cartographer的包有两个
cartographer:集合了cartographer本身的算法,不需要ROS环境也可以安装使用
cartographer_ros:将cartographer应用在ros中的工具,包括消息,服务订阅和发布等等
因此,这两个包我们都需要安装,进入自己的工作空间,输入
1
2
git clone -b dashing https://github.com/ros2/cartographer_ros git clone -b ros2 https://github.com/ros2/cartographer
进入根目录编译
注意:如果报错,则参考此Pull Request的代码修改,再一次编译
cartographer运行示例 cartographer的可配置的传感器非常多,并且同时支持2d和3d的建图。为了上手更为快捷,针对我们之前利用gazebo做的仿真机器人,我们仅使用激光雷达来建立2d地图,并且说明配置文件的各参数意义。
进入项目更目录,输入以下命令,记得输入之前source以下
1 ros2 launch my_slam cartographer.launch.py
如果一切正常可以看见如下内容,gazebo启动雷达扫描,同时在cartographer进行SLAM建图,并且显示在rviz中。
此时,打开另外一个终端,启动键盘控制
1 ros2 run teleop_key_control teleop_key_control
就可以进行整张地图的建立
部署代码说明 1 2 3 4 5 6 7 8 9 10 11 12 13 14 15 16 17 18 19 20 21 22 23 24 25 26 27 28 29 30 31 32 33 34 35 36 37 38 39 40 41 42 43 44 45 46 47 48 49 50 51 52 53 54 55 56 import osfrom ament_index_python.packages import get_package_share_directoryfrom launch import LaunchDescriptionfrom launch import actionsfrom launch.actions import IncludeLaunchDescriptionfrom launch.launch_description_sources import PythonLaunchDescriptionSourcefrom launch_ros.actions import Nodedef generate_launch_description (): pkg_dir = get_package_share_directory('robot_description' ) rviz_config_file= os.path.join(get_package_share_directory('my_slam' ), 'rviz2' , 'carto_slam.rviz' ) gazebo = IncludeLaunchDescription( PythonLaunchDescriptionSource( os.path.join(pkg_dir, 'gazebo_lab_world.launch.py' ) ), ) lua_configuration_directory = os.path.join( get_package_share_directory('my_slam' ), 'lua' ) lua_configuration_name = 'my_slam_indoor_2d.lua' cartographer = Node( package='cartographer_ros' , executable='cartographer_node' , name='cartographer_node' , arguments=['-configuration_directory' , lua_configuration_directory, '-configuration_basename' , lua_configuration_name ], remappings = [('scan' , 'scan' )], output='screen' , ) cartographer_map = Node( package='cartographer_ros' , executable='occupancy_grid_node' , name='occupancy_grid_node' , arguments=['-resolution' , '0.05' ], output='screen' , ) rviz = Node( package='rviz2' , executable='rviz2' , name='rviz2' , arguments=['-d' , rviz_config_file], output='screen' , ) return LaunchDescription([ gazebo, cartographer, cartographer_map, rviz, ])
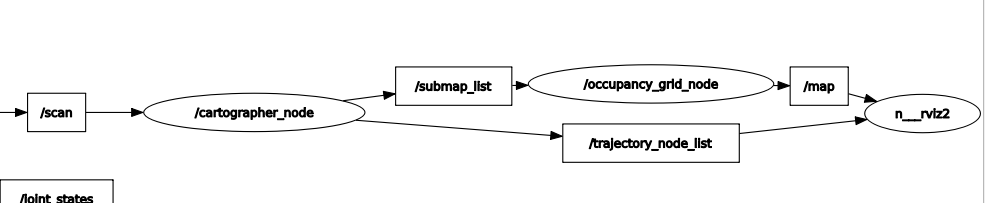
这里我们启动了四个节点,一个是用于仿真的gazebo节点,主要输出/scan 话题。
一个是cartographer_node节点,订阅/scan话题,发布用于生成地图的/submap_list话题,以及轨迹等
一个是occupancy_grid_node节点,主要订阅/submap_list话题来发布/map话题,即ros格式的二维栅格地图
通过rqt来查看我们所用到的node和topic之间的关系
配置文件说明 其实,cartographer可以支持多种传感器的数据融合,包括GPS, IMU,点云等等 。在我们的lua配置文件中,将其配置成只订阅scan话题,应用于2d的配置。这是我们使用的详细配置文件
1 2 3 4 5 6 7 8 9 10 11 12 13 14 15 16 17 18 19 20 21 22 23 24 25 26 27 28 29 30 31 32 33 34 35 36 37 38 39 40 41 42 43 44 45 46 47 48 49 50 51 52 53 54 55 56 57 58 59 60 61 62 63 64 65 66 67 68 69 70 71 72 73 74 75 76 77 78 79 80 81 82 83 84 85 86 include "map_builder.lua" include "trajectory_builder.lua" options = { map_builder = MAP_BUILDER, trajectory_builder = TRAJECTORY_BUILDER, map_frame = "map" , tracking_frame = "base_footprint" , published_frame = "odom" , odom_frame = "odom" , provide_odom_frame = false , publish_frame_projected_to_2d = false , use_odometry = true , use_nav_sat = false , use_landmarks = false , num_laser_scans = 1 , num_multi_echo_laser_scans = 0 , num_subdivisions_per_laser_scan = 1 , num_point_clouds = 0 , lookup_transform_timeout_sec = 0.2 , submap_publish_period_sec = 0.3 , pose_publish_period_sec = 5e-3 , trajectory_publish_period_sec = 30e-3 , rangefinder_sampling_ratio = 1. , odometry_sampling_ratio = 1. , fixed_frame_pose_sampling_ratio = 1. , imu_sampling_ratio = 1. , landmarks_sampling_ratio = 1. , } MAP_BUILDER.use_trajectory_builder_2d = true TRAJECTORY_BUILDER_2D.use_imu_data = false TRAJECTORY_BUILDER_2D.min_range = 0.3 TRAJECTORY_BUILDER_2D.max_range = 6. TRAJECTORY_BUILDER_2D.use_online_correlative_scan_matching = false TRAJECTORY_BUILDER_2D.ceres_scan_matcher.occupied_space_weight = 1. TRAJECTORY_BUILDER_2D.ceres_scan_matcher.translation_weight = 1. TRAJECTORY_BUILDER_2D.ceres_scan_matcher.rotation_weight = 1. TRAJECTORY_BUILDER_2D.submaps.num_range_data = 80. TRAJECTORY_BUILDER_2D.submaps.grid_options_2d.resolution = 0.1 POSE_GRAPH.optimize_every_n_nodes = 160. POSE_GRAPH.constraint_builder.sampling_ratio = 0.3 POSE_GRAPH.constraint_builder.max_constraint_distance = 15. POSE_GRAPH.constraint_builder.min_score = 0.48 POSE_GRAPH.constraint_builder.global_localization_min_score = 0.60 return options
lua文件的配置一共分为三个部分:
options:必须要有的,所有的变量参数都要存在,要是有一个不存在就会报错
需要引入map_build.lua
需要引入trajectory_builder
map_builder = MAP_BUILDER, 此为引入地图建立,即map_builder.lua文件的配置信息,不需要更改
trajectory_builder = TRAJECTORY_BUILDER, 此为建立轨迹,即trajectory_builder.lua文件的配置信息,不需要更改
map_frame = “map” 地图坐标系的名字设定
将所有传感器数据转换到这个坐标系下,一般将此设定为更新频率较高的坐标系上,比如IMU,但是这里我们没有使用IMU,因此选择了base_footprint
published_frame = “odom” 这个参数表示需要把map的tf发布到哪个坐标系上。我们在仿真环境中构建的机器人中的tf树如下所示
因此,我们只需要把map和odom建立tf关系,就可以让map连通到整个frame中
odom_frame = “odom” 这里指定的名字表示需要用cartographer发布的里程计坐标系的名字
provide_odom_frame = false 表示是否需要让cartographer提供一个里程计坐标系
use_odometry = true 是否使用里程计,如果使用要求一定要有odom的tf
use_nav_sat = false 是否使用gps
use_landmarks = false 是否使用landmark,landmark是cartographer自带的一种数据结构
num_laser_scans = 1 激光雷达使用的个数。注意,如果使用了激光雷达,需要在launch文件中重设一下cartographer默认订阅激光的topic名字。
=0,则不用laser_scan
=1。订阅scan topic的名字默认为 /scan
=2。订阅scan_1,scan_2两种topic
=3。订阅scan_1,scan_2,scan_3三种topic
…
num_multi_echo_laser_scans = 0 是否使用多回声波雷达
num_subdivisions_per_laser_scan=1 表示1帧数据被分成几次处理,一般为1
num_point_clouds = 0 是否使用点云数据,这个话题订阅名字和规则和激光雷达的一样
=0。不使用点云来建图
=1。订阅points2
=2。订阅points2_1,points2_2
…
MAP_BUILDER.use_trajectory_builder_2d = true 表示使用的是2d建图
更多的参数说明可以参考官方网站https://google-cartographer-ros.readthedocs.io/en/latest/进行学习